| Email Us: androidref@gmail.com |
| Architecture Videos | Google API Add-On | IBM developerWorks | Android Developer Forum | Stack Overflow Forum |
| Using the Google Maps API to map a location and add a marker to the map | ^Top |
Assuming that you have a way to get the latitude and longitude for your Android phone (Location Services API, provider API, etc.), you can use the Google Maps API to generate a map of the phone's location. You can also insert a marker image onto the map at the location.
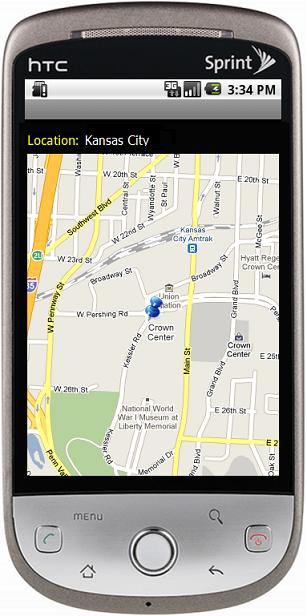 |
The basics of the process are explained in Google Maps External Library. The first step is to get a Google Maps key. This process is very straightforward. For initial testing, simply use the built-in SDK debug certificate discussed in Getting the MD5 Fingerprint of the SDK Debug Certificate.
Next, since the Google Maps API add-on is already installed in the Android SDK, you just need to configure your app to use it. As outlined in Referencing the Maps Library from the Application's Manifest File, add the following uses-library and uses-permission statements to your manifest file:
    ...
    <uses-library android:name="com.google.android.maps" />
    </application>
    <uses-permission android:name="android.permission.INTERNET" />
    ...
In main.xml, you need to add a MapView to display your map:
    <com.google.android.maps.MapView android:id="@+id/mapview" android:enabled="true"
        android:clickable="true" android:apiKey="<API key that you received from Google>" />
Now that the app is set up to use the map API, and you've got a place to display the map, here's the Java source to both show the map and add a marker. First, the application class must extend MapActivity.
public class MyMapApp extends MapActivity
Next, I found it easiest to create a Marker class, that extends Overlay, to represent the pushpin I'll put onto the application (R.drawable.pin).
    class Marker extends com.google.android.maps.Overlay
    {
        GeoPoint location = null;

        public Marker(GeoPoint location)
        {
            super();
            this.location = location;
        }

        @Override
        public void draw(Canvas canvas, MapView mapView, boolean shadow)
        {
            super.draw(canvas, mapView, shadow);
            Point screenPoint = new Point();
            mapView.getProjection().toPixels(this.location, screenPoint):
            canvas.drawBitmap(BitmapFactory.decodeResource(getResources(), R.drawable.pin),
                screenPoint.x, screenPoint.y - 8, null);  // -8 as image is 16px high
        }
    }
Lastly, use the following code to use your latitude and longitude (in this case acquired from a location service in JSON format) and move the MapController to that location. This example also shows how to use the Geocoder class to add the location name to the screen, and finally, adds the marker at the correct location.
    //
    //  Assume you've returned lat and lon from a location service in JSON format.
    //
    JSONObject results = new JSONObject(buffer.toString());
    double lat = Double.parseDouble((String) results.get("lat"));
    double lon = Double.parseDouble((String) results.get("lon"));

    //
    //  Using lat and lon, acquire the map and display in the view.
    //
    MapView mapView = (MapView) findViewById(R.id.mapview);
    MapController mc = mapView.getController();
    GeoPoint location = new GeoPoint((int) (lat * 1E6), (int) (lon * 1E6));
    mc.animateTo(location);
    mc.setZoom(16);

    //
    //  Write the location name.
    //
    try {
        Geocoder geo = new Geocoder(getBaseContext(), Locale.getDefault());
        List<Address> addresses = geo.getFromLocation(lat, lon, 1);
        if (addresses.size() > 0) {
            ((TextView) findViewById(R.id.city)).setText(addresses.get(0).getLocality());
        }
    }
    catch (Exception e) {
        e.printStackTrace(); // getFromLocation() may sometimes fail
    }

    //
    //  Add a marker at the map location.
    //
    List listOfOverlays = mapView.getOverlays();
    listOfOverlays.clear();
    listOfOverlays.add(new Marker(location));

    //
    // Force view to redraw.
    //
    mapView.invalidate();
| How to create an SD card, store a contact photo, and display the photo on the handset | ^Top |
Contacts can store a contact photo. To simulate this behavior in the emulator, you must first "add" an "SD card" to store the picture. Once it's stored, you can retrieve it in your application and display it on the screen.
First, add an SD card. The card is actually a file on disk referenced by AVD. To create the card, use the mksdcard tool described in Creating an SD card image using mksdcard.
Once the file is created, you need to tell your AVD where it is. In Eclipse, open your Run Configurations, pick Android Application, select the Target tab, and add the following line to your Additional Emulator Command Line Options:
-sdcard <path to the file>\sdcard.iso
Once the AVD/emulator has been started with the SD card, you can store a photo for your contact using the Android Debug Bridge (adb) tool. This tool can be found in stored in the Android SDK's /tools directory. To add a photo to the card:
adb push myphoto.png /sdcard/myphoto.png
An alternative to using adb to add a file to the sdcard is to use the Dalvik Debug Monitor (DDMS) tool. This tool can also be found in the Android SDK's /tools directory. (It's started with ddms.bat on Windows.) Once the monitor is running, and you've selected an emulator to attach, select "Device/File Explorer". You can then use the "Push file onto Device" button to move the file from your computer to the emulator sdcard.
The following code now shows how to find a contact based on name, and once it's found, how to retrieve the contact photo as a bitmap:
    //
    //  Find contact based on name.
    //
    ContentResolver cr = getContentResolver();
    Cursor cursor = cr.query(ContactsContract.Contacts.CONTENT_URI, null,
        "DISPLAY_NAME = '" + NAME + "'", null, null);
    if (cursor.moveToFirst()) {
        String contactId =
            cursor.getString(cursor.getColumnIndex(ContactsContract.Contacts._ID));
        //
        // Get the contact photo.
        //
        Uri uri = ContentUris.withAppendedId(ContactsContract.Contacts.CONTENT_URI,
            Long.parseLong(contactId));
        InputStream input =
            ContactsContract.Contacts.openContactPhotoInputStream(cr, uri);
        Bitmap contactPhoto = BitmapFactory.decodeStream(input);
        ...
Once you have the photo as a bitmap, you can use a technique similar to the pushpin above to display it on the screen:
    class Photo extends com.google.android.maps.Overlay
    {
        Bitmap image = null;

        public Picture(Bitmap image)
        {
            super();
            this.image = image;
        }

        @Override
        public void draw(Canvas canvas, MapView mapView, boolean shadow)
        {
            super.draw(canvas, mapView, shadow);
            canvas.drawBitmap(this.image, 0.0F, 0.0F, null);
        }
    }
    ...
    listOfOverlays.add(new Photo(contactPhoto));
    ...
| How to use ContactsContract to retrieve phone numbers and email addresses | ^Top |
ContactsContract is the contract between a contacts provider and applications that want to use contacts. The following code shows how to find a contact based on name, and once it's found, how to retrieve the various types of phone numbers and email addresses:
    //
    //  Find contact based on name.
    //
    ContentResolver cr = getContentResolver();
    Cursor cursor = cr.query(ContactsContract.Contacts.CONTENT_URI, null,
        "DISPLAY_NAME = '" + NAME + "'", null, null);
    if (cursor.moveToFirst()) {
        String contactId =
            cursor.getString(cursor.getColumnIndex(ContactsContract.Contacts._ID));
        //
        //  Get all phone numbers.
        //
        Cursor phones = cr.query(Phone.CONTENT_URI, null,
            Phone.CONTACT_ID + " = " + contactId, null, null);
        while (phones.moveToNext()) {
            String number = phones.getString(phones.getColumnIndex(Phone.NUMBER));
            int type = phones.getInt(phones.getColumnIndex(Phone.TYPE));
            switch (type) {
                case Phone.TYPE_HOME:
                    // do something with the Home number here...
                    break;
                case Phone.TYPE_MOBILE:
                    // do something with the Mobile number here...
                    break;
                case Phone.TYPE_WORK:
                    // do something with the Work number here...
                    break;
                }
        }
        phones.close();
        //
        //  Get all email addresses.
        //
        Cursor emails = cr.query(Email.CONTENT_URI, null,
            Email.CONTACT_ID + " = " + contactId, null, null);
        while (emails.moveToNext()) {
            String email = emails.getString(emails.getColumnIndex(Email.DATA));
            int type = emails.getInt(emails.getColumnIndex(Phone.TYPE));
            switch (type) {
                case Email.TYPE_HOME:
                    // do something with the Home email here...
                    break;
                case Email.TYPE_WORK:
                    // do something with the Work email here...
                    break;
            }
        }
        emails.close();
    }
    cursor.close();
| Manually creating a hyperlink | ^Top |
While the Android SDK provides the Linkify class to generate specific kinds of hyperlinks, it seems to only handle certain formats. When I needed to hyperlink a phone number and have it send a text message, this is the solution I came up with.
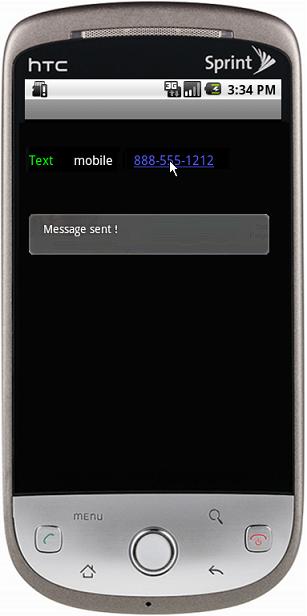 |
My application had access to a text messaging service, and I wanted to create a hyperlink around the phone number that would send a canned text message to the phone when the link was clicked. To create this type of hyperlink, I first created a SpannableString, set it to a "blank" URL, and then added a click listener to intercept the click. Visually, this looked like a normal hyperlinked phone number to the user, but the code allowed me to do whatever I wanted in the listener when the link was clicked. Here's the first part of the code:
    tv = (TextView) findViewById(R.id.phone);
    SpannableString str = SpannableString.valueOf(PHONE_NUMBER);
    str.setSpan(new URLSpan(""), 0, entryValue.length(), Spannable.SPAN_INCLUSIVE_EXCLUSIVE);
    tv.append(str);
    tv.setOnClickListener(new TextMessageListener(number, this.getString(R.string.error)));
The listener implements the OnClickListener interface, and in the onClick() method, it makes the HTTP request, processes the response, and "Toasts" the user:
    private class TextMessageListener implements OnClickListener
    {
    ...
        @Override
        public void onClick(View v)
        {
            try {
                URL url = new URL(generateMyHTTPRequest(PHONE_NUMBER));
                BufferedReader in =
                    new BufferedReader(new InputStreamReader(url.openStream()));
                StringBuffer buffer = new StringBuffer();
                String line;
                while ((line = in.readLine()) != null) {
                    buffer.append(line);
                }
                in.close();
                // process response in buffer.toString()
                Toast.makeText(getBaseContext(), "Message sent!",
                    Toast.LENGTH_LONG).show();
            }
            catch (Exception e) {
                e.printStackTrace();
            }
        }
    };
| Configuring the emulator's browser to load "localhost" web pages | ^Top |
If you'd like to develop HTML pages and view them in your Android emulator, there are two steps you need to take.
First, you must set up a web server to serve your pages to the emulator. This involves installing and configuring a web server (or app server that has a built-in web server). Some well-known examples are the Apache Web Server, Tomcat, and JBoss. Once you can use your local web browser to display a URL like http://localhost:8080/MyTestPage.html, then you're ready to proceed to the next step.
As explained in Emulator Networking, the emulator's network architecture includes a virtual router. But it's very easy to map your local web server to the emulator via the router. The article explains that "the address 127.0.0.1 on your development machine corresponds to the emulator's own loopback interface. If you want to access services running on your development machine's loopback interface (a.k.a. 127.0.0.1 on your machine), you should use the special address 10.0.2.2 instead.".
So, the two URLs below should serve the same page, one to your computer browser and one to your emulator browser:
    http://localhost:8080/MyTestPage.html // URL to use in computer browser
    http://10.0.2.2:8080/MyTestPage.html  // URL to use in emulator browser
    -startup

    plugins/org.eclipse.equinox.launcher_1.0.201.R35x_v20090715.jar

    --launcher.library

    plugins/org.eclipse.equinox.launcher.win32.win32.x86_1.0.200.v20090519

    -vm C:/jdk1.6.0_18/jre/bin/javaw.exe

    -product

    org.eclipse.epp.package.jee.product

    --launcher.XXMaxPermSize

    256M

    -vmargs

    -Xss4m

    -XX:PermSize=256m

    -XX:MaxPermSize=384m

    -XX:CompileThreshold=5

    -XX:MaxGCPauseMillis=10

    -XX:MaxHeapFreeRatio=70

    -XX:+UseConcMarkSweepGC

    -XX:+CMSIncrementalMode

    -XX:+CMSIncrementalPacing

    -Dcom.sun.management.jmxremote

    -Dorg.eclipse.equinox.p2.reconciler.dropins.directory=C:/jv/eclipse/mydropins

    -Dosgi.requiredJavaVersion=1.5

    -Xms512m

    -Xmx1024m
| Calling Sprint services | ^Top |
Android offers a collection of built-in APIs for mapping and location-based services applications. Location and Maps provides an overview of these services.
Provider-specific services also exist, however, and Sprint specifically offers a number of services to developers that can be used during development from within an Android application in the emulator. To sign up to use these services, and to learn more about what's available, go to the Sprint Services page.
Assuming you've signed up and been given your unique KEY and a SECRET, the example below shows how to call one of the location-based services to get the latitude and longitude of a real phone. Note that the phone you're tracking will first have to "opt in" as described on the Getting Started & User Management page.
The code is very straightforward. First, you need to build an HTTP request to the service. The URL for this request contains the parameters required by the service, as well as a uniquely-generated signature for the request that identifies you as the caller. The services support a number of different response formats, as identified by the "extension" before the query string e.g. the example below shows a request for JSON formatted data (.json).
    private String generateRequestURL()
    {
        String url = null;
        try {
            String timestamp = new SimpleDateFormat("yyyy-MM-dd'T'HH:mm:ssz").format(
                new Timestamp(new java.util.Date().getTime()));
            url = "http://www.sprintdevelopersandbox.com/developerSandbox/" +
                "resources/v1/location.json?" +
                "key=" + KEY + "&mdn=" + MDN + "×tamp=" + timestamp +
                "&sig=" +
                computeMD5("key" + KEY + "mdn" + MDN + "timestamp" + timestamp + SECRET);
        }
        catch (Exception e) {
            e.printStackTrace();
        }
        return url;
    }

    public final String computeMD5(String input) throws NoSuchAlgorithmException
    {
        StringBuffer output = new StringBuffer();
        byte [] buffer = MessageDigest.getInstance("MD5").digest(input.getBytes());
        for (int i = 0; i < buffer.length; i++) {
            int ch = (int) buffer[i];
            if (ch < 0) {
                ch = (Math.abs(ch) - 1) ^ 255;
            }
            output.append(toHex(ch >>> 4) + toHex(ch & 15));
        }
        return output.toString();
    }

    private final String toHex(int s)
    {
        if (s < 10) {
            return new StringBuffer().append((char)('0' + s)).toString();
        }
        else {
            return new StringBuffer().append((char)('A' + (s - 10))).toString();
        }
    }
Once you have the URL, it's a simple matter to make the request and process the response:
    //
    //  Make the request and read the response.
    //
    URL url = new URL(generateRequestURL());
    BufferedReader in = new BufferedReader(new InputStreamReader(url.openStream()));
    StringBuffer buffer = new StringBuffer();
    String line;
    while ((line = in.readLine()) != null) {
        buffer.append(line);
    }
    in.close();
    //
    //  Parse the response (JSON format).
    //
    JSONObject results = new JSONObject(buffer.toString());
    String lat = (String) results.get("lat");
    String lon = (String) results.get("lon");
| Files that make up an Android application | ^Top |
As taken directly from List of Files for an Android Application, the following table shows the required and optional files that are part of every Android appplication:
| MyApp/ |
|
| AndroidManifest.xml | [REQUIRED] Advertises the screens that this application provides, where they can be launched (from the main program menu or elsewhere), any content providers it implements and what kind of data they handle, where the implementation classes are, and other application-wide information. Syntax details for this file are described in The AndroidManifest.xml File. |
| src/ /myPackagePath/.../MyClass.java |
[REQUIRED] This folder holds all the source code files for your application, inside the appropriate package subfolders. |
| res/ | [REQUIRED] This folder holds all the resources for your application. Resources are external data files or description files that are compiled into your code at build time. Files in different folders are compiled differently, so you must put the proper resource into the proper folder. (See Resources for details.) |
| anim/ animation1.xml ... |
(Optional) Holds any animation XML description files that the application uses. The format of these files is described in Resources. |
| drawable/ some_picture.png some_stretchable.9.png some_background.xml ... |
(Optional) Zero or more files that will be compiled to
android.graphics.drawable resources. Files
can be image files (png, gif, or other) or XML files describing other graphics such as bitmaps, stretchable bitmaps, or gradients. Supported
bitmap file formats are PNG (preferred), JPG, and GIF (discouraged), as well as the custom 9-patch stretchable bitmap format. These formats
are described in Resources. |
| layout/ screen_1_layout.xml ... |
(Optional) Holds all the XML files describing screens or parts of screens. Although you could create a screen in Java, defining them in XML files is typically easier. A layout file is similar in concept to an HTML file that describes the screen layout and components. See User Interface for more information about designing screens, and Available Resource Types for the syntax of these files. |
| values/ arrays classes.xml colors.xml dimens.xml strings.xml styles.xml values.xml |
(Optional) XML files describing additional resources such as strings, colors, and styles. The naming, quantity, and number of these files are not enforced--any XML file is compiled, but these are the standard names given to these files. However, the syntax of these files is prescribed by Android, and described in Resources. |
| xml/ | (Optional) XML files that can be read at run time on the device. |
| raw/ | (Optional) Any files to be copied directly to the device. |
| Using intents to invoke Google applications | ^Top |
An intent is a message that your application can send to an activity, service, or broadcast receiver to trigger an action or pass information to that component. Intents and Intent Filters explains intents, the Intent object, and how intents are delivered.
One intent-related feature built into the Android platform is the ability to send a number of intents to built-in Google applications to do things like dial a phone number (Dialer), open a map at a location (Google Maps), or open a web page (Browser). These intents are explained at Intents List: Invoking Google Applications on Android Devices.
The mapping sample above can be extended to add a button to the page that pops up a Google Streetview picture of the user's current location:
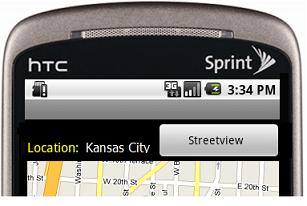 |
To add the button, first add a <Button> entry to main.xml:
    <Button android:id="@+id/streetview" android:text="@string/streetview"
            android:layout_width="wrap_content" />
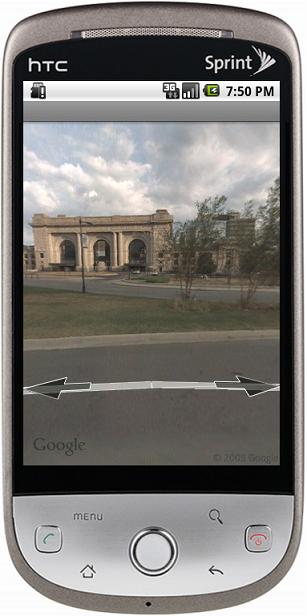
Next, within your Java source, create the button and add an onClickListener to handle the click. The onClick() method will start a new activity and send it an ACTION_VIEW intent. The intent uses the google.streetview: URI as documented on the Intents List: Invoking Google Applications on Android Devices page:
    ...
    Button button = (Button) findViewById(R.id.streetview);
    button.setOnClickListener(new View.OnClickListener()
    {
        public void onClick(View view)
        {
            String uri = "google.streetview:cbll=" + latitude + "," +
                longitude + "&cbp=1,180,,0,2.0";
            startActivity(new Intent(Intent.ACTION_VIEW, Uri.parse(uri)));
        }
    });
    ...
Here's what you'll see after clicking the "StreetView" button:
 |
Lastly, notice the location name in the first screenshot. This can be acquired by passing latitude and longitude to the Geocoder class:
    //
    //  Write the location name.
    //
    try {
        Geocoder gcd = new Geocoder(getBaseContext(), Locale.getDefault());
        List<Address> addresses = gcd.getFromLocation(lat, lon, 1);
        if (addresses.size() > 0) {
            ((TextView) findViewById(R.id.city)).setText(addresses.get(0).getLocality());
        }
    }
    catch (Exception e) {
        e.printStackTrace();
    }